The Visual Magnetics Graphic System
Tips and Tricks for a Trouble-Free Installation
The Visual Magnetics Graphic System is designed for application on smooth hard surfaces. The system is comprised of a layer of InvisiLock magnetic sheeting that is applied to a wall or panel plus a layer (or layers) of MagnaMedia. Visual Magnetics MagnaMedia is a thin print-receptive film or fabric that is coated with Micro-Iron® particles on the reverse side allowing the print to attract to the InvisiLock magnet sheeting. Once a base layer of InvisiLock sheeting is applied to the wall or panel(s), you are able to roll out your MagnaMedia graphics in a single layer or multiple layers and change them out with ease without the use of an adhesive. The InvisiLock layer stays on the wall or panel and will not lose its magnetic properties over time, so the same magnetic sheeting may be used indefinitely.
The Visual Magnetics Graphic System may be applied to hard surface panels to create signs and displays or it may be applied direct to wall surfaces for large wall treatments and murals. Both applications require InvisiLock sheeting that allows the graphic film to attract to the wall or panel.
If using the graphic wall with magnetic fixtures is planned then please see section 12 on fixturing with InvisiLock as there are tips and tricks specific to fixturing with the magnetic sheeting.
Hard panel and fixture application: We recommend using single-sided InvisiLock with a self-adhesive backer on hard panels. This is a peel-and-stick product that has adhesive and release liner applied to the back surface of the sheet. The adhesive will stick to metal, sealed wood, glass, paper, or plastic surfaces that are smooth, hard and free from moisture, oils or other surface contaminants. (ref. -30SE, -30HE, -30HP, -30SA.) Always follow the substrate manufacturer’s recommendation on surface preparation for a rubber-based pressure-sensitive adhesive.
Plastic board products should be thoroughly cleaned with an isopropyl alcohol solution (70% alcohol / 30% water) and then tested for adhesion performance prior to final installation.
Wood products such as MDF and smooth plywood should be sealed with a shellac universal sanding sealer, sanded smooth with a fine grit (i.e.320 grit) sandpaper, cleaned thoroughly and tested for adhesion performance prior to final installation.
Direct to Wall application: We recommend using Visual Magnetics double-sided, InvisiLock in combination with Visual Magnetics ActiveWall primer for applying the graphic system to larger wall surfaces (especially drywall/plastered walls). Double-sided InvisiLock is magnetic on both sides of the 40-mil film and is magnetically attracted to a wall that has been painted previously with ActiveWall primer, eliminating the need for adhesives or pastes. The ActiveWall primer is a non-toxic, latex product with Micro-Iron particles that turns your wall into a magnetic receptive surface. Please note that a wall that has ActiveWall primer will attract a magnet (as is InvisiLock) but will not attract the MagnaMedia films or fabrics without the layer of InvisiLock. ActiveWall can be used as a basecoat primer for other finishes.
Note on Applying InvisiLock to Drywall: The double-sided InvisiLock (40HE and 40HP) used with ActiveWall is the only VM-guaranteed solution for direct-to-drywall applications. The magnetic attraction between these two products is indefinite and mitigates the risk of failure, while indoor rubber adhesives have a 2-year warranty.
Many latex topcoats (found on drywall) do not readily accept pressure sensitive adhesives and adhesives used on painted surfaces may fail over time.
Customers that insist on using adhesive-backed InvisiLock for permanent installation onto drywall should consider the following wall preparation to minimize the risk of adhesive failure:
1) Be sure paint is completely cured per manufacturer’s recommended cure time (usually 5 days for newly painted surfaces)
2) Be sure walls are clean and free from contaminants
3) Wash surface of walls with a TSP solution (per instructions) and let dry for 24 hours.
4) If paint surface is unknown then it is recommended that the wall be painted (over existing paint) with a primer that has been tested with the adhesive and determined to deliver good results.
It is the print service provider’s/installer’s responsibility to prepare wall surfaces and test for adhesion performance prior to final installation. VM does not recommend or warranty adhesion to painted surfaces.
High energy vs. standard energy InvisiLock: We recommend using our high energy InvisiLock magnet when applying 3 – 5 layers of MagnaMedia graphics or when fixturing with the magnet (see section on fixturing with Invisilock). Standard energy magnet is plenty sufficient for one and two two layers of MagnaMedia graphics.
Note: All double-sided Invisilock (40HE) is high energy by nature.
InvisiLock with Surface Protect: InvisiLock -40HP is designed to be applied to walls that require frequent removal/ reapplication of the magnetic backer sheeting. The white surface protect should face the painted wall to prevent scuffing. The white surface, when facing the wall, helps prevent scuffing.
InvisiLock with Surface Protect: InvisiLock – 30HP is designed to be applied to a fixture that is magnetically attached to a VM graphic wall. This will help prevent the fixture from scuffing the graphics when applying/repositioning the fixture over the graphics on the wall.
Magnet Preparation/Surface Preparation for Adhesive-backed Invisilock Magnet
• Lay Flat: Rolled magnet must lay flat prior to installation. Rolled magnet has a curl “memory” that can cause installation problems if magnet is not allowed to “Relax” prior to installation. Un-roll magnet quantity to be installed and allow to lay flat for minimum of 1 hour before attempting to install. If magnet curls away from application surface during installation, failure may occur.
• Room temperature: To properly promote adhesion to the substrate, it is crucial that the adhesive-backed magnet be warmed to room temperature. Heat guns are helpful as a means to further promote adhesion when applying or as an aid to flatten the magnet.
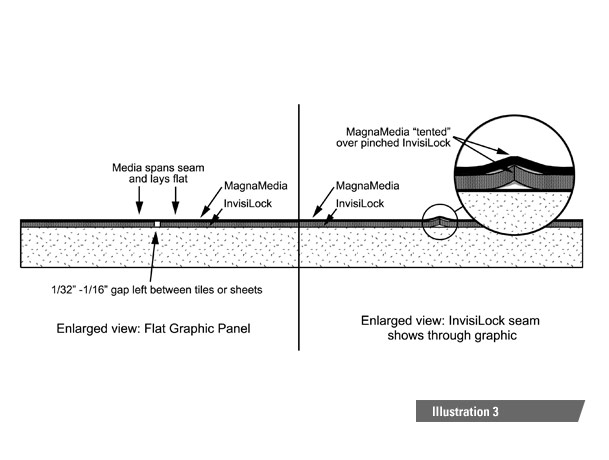
• Tiling: It is recommended that when tiling magnet, to leave a 1/32” – 1/16” gap between adjacent magnet sheets. A slight gap is easily spanned with MagnaMedia whereas magnet that has been pushed together too tightly can cause a lip that will show-through the print with undesirable results.
• Vertical surfaces: For tiling sheets on (pre-installed) vertical panels, we recommend running the sheets vertically and applying from the top down. Horizontal tiling is more difficult to keep square and apply to the board substrate evenly.
Application
The back of self-adhesive InvisiLock magnetic sheet has a clear rubber-based adhesive and a white film release liner. This magnet film is pliable and the adhesive is aggressive so we recommend applying it in the same fashion as an adhesive vinyl film. Simply position the product in the desired location, tape down a leading edge and peel back the liner, smoothing out the sheet as you go. Use a squeegee to burnish the material to the panel surface and eliminate air bubbles from forming under the sheet. Once the entire release liner is peeled away and removed, finish smoothing out the sheet applying even pressure to ensure that the entire adhesive surface is pressed against the panel. InvisiLock custom engineered magnet can be trimmed using a razor-knife, scissors or resized with the panel (after application) using standard wood cutting tools.
The Visual Magnetics Graphic System is designed for application on smooth hard surfaces. The system is comprised of a layer of InvisiLock magnetic sheeting that is applied to a wall or panel plus a layer (or layers) of MagnaMedia. Visual Magnetics MagnaMedia is a thin print-receptive film or fabric that is coated with Micro-Iron® particles on the reverse side allowing the print to attract to the InvisiLock magnet sheeting. Once a base layer of InvisiLock sheeting is applied to the wall or panel(s), you are able to roll out your MagnaMedia graphics in a single layer or multiple layers and change them out with ease without the use of an adhesive. The InvisiLock layer stays on the wall or panel and will not lose its magnetic properties over time, so the same magnetic sheeting may be used indefinitely.
Best results are achieved by properly preparing the wall surface so that it is free of dirt, oils, and other contaminants. The wall surface should be as smooth as possible to maximize surface area with the InvisiLock magnet sheeting (a level 5 finish is preferred). A textured wall should be smoothed over with a filling compound and/or sanded smooth before applying the ActiveWall primer. Applying ActiveWall primer and magnetic sheeting to a textured wall or a wall that has rough spots may result in low attraction of magnet sheeting to the wall and/or bumps and wall texture showing through to the graphic surface.
ActiveWall is a premier, non-toxic basecoat paint that can be used under wall finishes creating a magnetic-receptive surface. After the wall surface is prepared and clean:
- Assemble the tools you will need to complete the job. You will need:
A. Standard wall painting supplies such as stirring sticks, paint tray, roller handle(s) and 1/4” – 3/8” nap roller(s).
B. A steel smoothing tool with handle such as a plaster trowel, a 10” – 12” steel putty knife or hand trowel.
- Mix the ActiveWall primer thoroughly by stirring it.
- For best results, temperature should be between 60F and 90F, humidity below 85%.
- Using the paint roller (foam rollers are not recommended) apply a liberal coat of primer as evenly as possible to the wall surface.
- Continue applying the first coat of primer until wall surface is covered. The primer dries quickly so apply it as evenly and quickly as possible while wet. DO NOT OVERWORK AS THIS MAY INCREASE THE TEXTURE.
- Allow primer to dry to the touch between coats (30 – 60 minutes)
- Apply a second coat by rolling the primer onto a 10 sq.ft. section at a time and then “striking” (smoothing) the wet primer with a trowel or 12” wide putty knife. This step will create a smooth surface that fills in any texture created by the roller.
- For best results apply 2 heavy to medium heavy coats. You should not apply less primer than the recommended coverage of 100 sq.ft. per gallon. The more iron particles that are on the wall, and the smoother the surface, the stronger the magnetic attraction with the layer of magnet.
- ActiveWall may be sprayed with an airless sprayer, for best results start with 5-19 tip. ActiveWall may be thinned with water to a spray-able consistency but is not recommended thinning by more than 20%.
- Easy clean up with soap and water.
Once the wall surface is dry, inspect for any small ridges or residue caused by dried paint chunks. Use a clean trowel or smooth wide putty knife to scrape off any small chunks or high spots in the wall surface. Small holes or cracks will not show through the magnet but bumps or high spots in the paint will so scrape the wall thoroughly.
If applying a top-coat paint: Allow the final coat of ActiveWall to dry at least 2 hours before applying a latex top coat or at least 24 hours before applying an oil based top coat of paint. InvisiLock magnetic sheeting should be applied to the wall only after the final coat of paint is fully dried and cured according to the paint manufacturer’s recommendations. Failure to letting the topcoat fully cure could result in the finish paint sticking to the back of the InvisiLock sheeting.
Once your wall surface is activated with ActiveWall primer, and the topcoat is completely cured, you are ready to apply the double-sided InvisiLock to your wall.
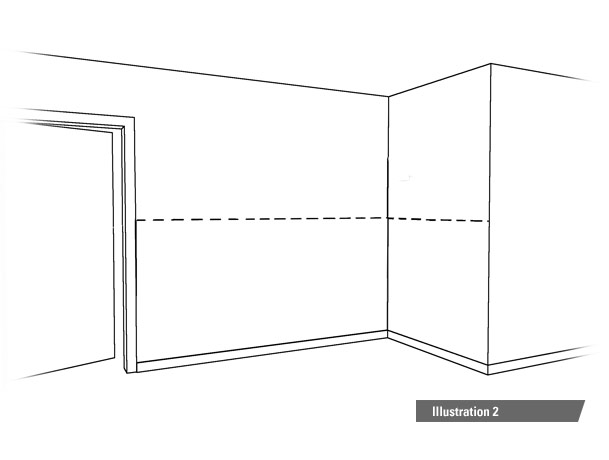
Begin the process by creating a level or plumb reference point (line) that will ensure your roll or tiles look straight. A line level or laser level works well for this (see Illustration 2).
If using roll goods, then cut the appropriate sized panels to length so that the pieces are easily managed. Be sure that the factory edge and all cut edges are flat and free of dents or defects. InvisiLock sheeting can be cut using a metal straight edge and a sharp razor knife. If the material has some roll-set curl) when coming off the roll, then simply back-roll a couple of feet near the ends of the panel so that it relaxes the curl and lays flat onto the wall.
If using the tiles, lay out your first row of tiles on your reference line. The tiles should be placed so that there is an even 1/32” – 1/16” space between them. This will allow for expansion/contraction during temperature changes and will eliminate the possibility of the magnet sheets pinching together and creating a high point. Do not worry about this small gap between the InvisiLock sheets or tiles; the MagnaMedia will span these seams without showing through to the finished surface (see Illustration 3).
Also note that the magnet sheeting does not need to be fit tightly to the floor, ceiling or wall. The sheeting should be kept (1/16” – 1/8”) away from the floor, ceiling and/or inside wall. Placing the magnet sheeting up to outside walls or openings is a matter of preference. You may use a knife to cut the magnet sheeting to the edge of the wall or opening or you may keep the edge of the magnet sheeting short a 1/4” or so that the graphic overlaps the magnet and is trimmed to the edge of the wall. Keeping the magnet short of the edge helps to hide the edge of the magnet.
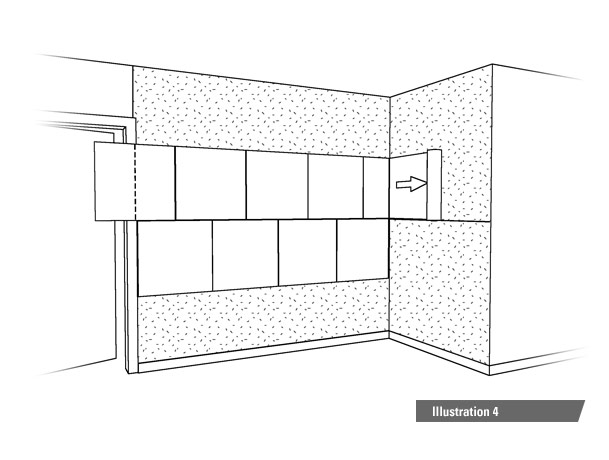
When using tiles, it’s best to lay out the tiles so that the end panels are cut to between 8” – 24” in width. This will prevent having thin strips on the end and it will help with staggering the seams.
When using tiles it is recommended that you stagger the vertical seams like one would with blocks or bricks when building a wall. This will help ensure that the graphic panels lay down flat (see Illustration 4).
Continue laying down the tiles or panels until the entire wall surface is covered.
A note on contamination: when scraping the wall and when cutting the InvisiLock magnetic sheet, it is worth every effort to keep dust and particulate off of the back or front surface of the magnetic sheet so that these do not create lumpy spots through the graphic.
You are now ready to apply the graphic/wall covering.
The first step in rolling out your graphic panels is identifying the rolls and their respective locations. Large seamed graphics that need to be trimmed onsite should be labeled so that the seam is properly placed and the correct panels trimmed correctly.
Once the rolls of graphics are identified, then re-roll the graphics so that they are rolled from the bottom to the top with the back (black iron coating) out. Use the magnetic wall that you just prepared to re-roll the graphics (instead of the floor); it’s cleaner and easier on your back.
Once the graphic panels are properly rolled, begin with the first panel by aligning the top edge and one side as best as possible and using gravity to help you unroll the panel downward. If you unroll a little bit and see that the graphic is not positioned correctly, then roll it back up, re-position and roll it out again.
If the panel needs to be fit to the ceiling, floor or inside wall then do so at this time (see section on fitting graphics to a wall).
Once the first panel is in the desired location, you may repeat with the subsequent panels, being careful to maintain the desired overlap at the seam and to properly align the image.
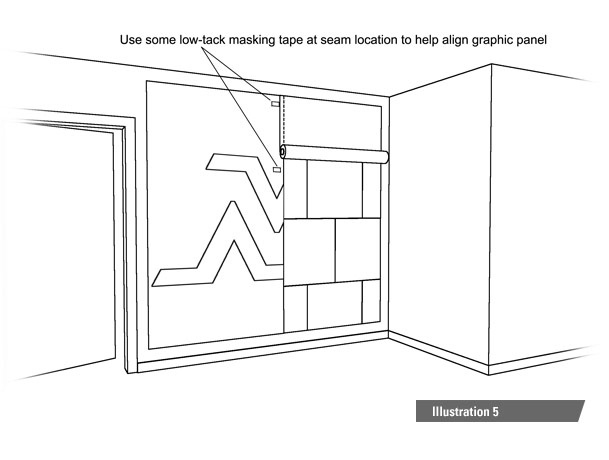
Alignment pointer: placing a couple of small pieces of low-tack masking tape at the panel seams will help you quickly align match up/align large graphic panels as you unroll them to the wall (see Illustration 5).
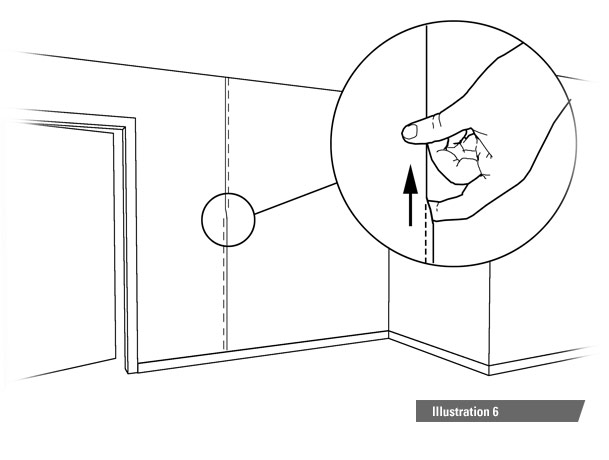
Note: Overlapping seams may be “switched over” to make them less noticeable. If the edge of the top panel is more noticeable from a common viewable direction, then simply tuck it under the bottom panel so that the panel edge is facing away from where most people will see it, toward a corner for instance (see Illustration 6).
Visual Magnetics MagnaMedia can easily be cut with a razor knife which makes cutting into corners, floors and ceilings much easier than fitting hard substrates. Panels that are meant to be fit tightly against the ceiling, floor and/or an inside wall should be sized 1” – 2” larger. The excess can be trimmed (in place) like wallpaper using a metal wallpaper blade or metal straight edge.
The MagnaMedia substrate will not bend or roll in two directions at once without kinking and damaging the graphic so do not attempt to position the panel so that there is excess at the floor, ceiling and a side that needs to be trimmed.
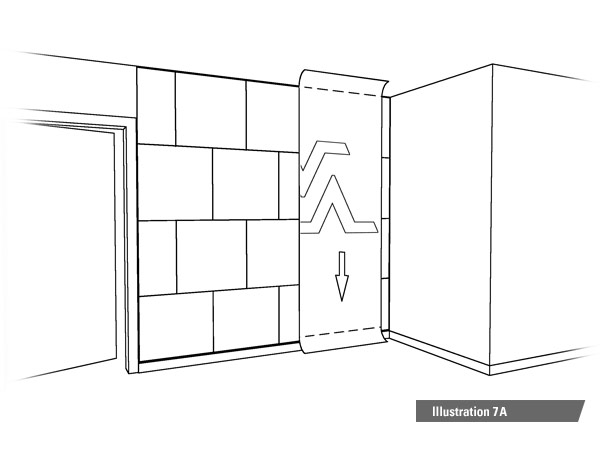
When fitting a large graphic mural that runs from floor to ceiling and fits into a corner, it is best to fit the graphic to height first, then reposition the panel to cut into the corner.
Simply roll out the panel as close to the corner as possible, without bending or kinking the panel into the corner, and trim the top and bottom so that it fits ceiling to floor (see Illustration 7A).
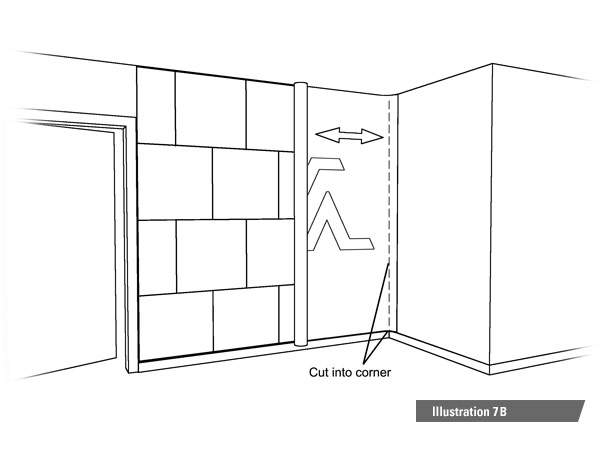
Then re-roll the graphic vertically and, with 1” – 2” of excess rolled into the corner, cut the panel into the corner using a scribe or a straight edge as you would with wallpaper. Alternatively, if covering the adjacent wall, then crease the panel into the corner and cover the 1″-2″ extra with the adjacent panel (see Illustration 7B).
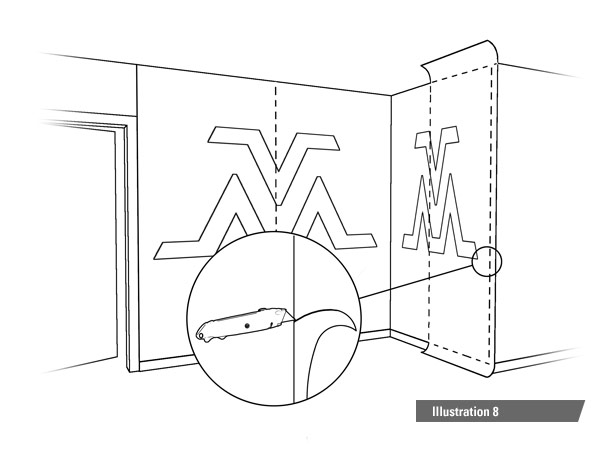
Oftentimes a graphic mural will be placed around a doorway or opening or the graphic will end where the wall makes an outside corner. In these instances we recommend that you oversize your graphic panels so that you have 3/4” – 1” that you can trim of the panel at the end. We also recommend that you save trimming these panels for the end so that if the graphic needs to be repositioned for some reason or other, you have some play. Once the panel is trimmed to fit a wall or opening, you are limited to repositioning it.
Once you have the panels where you want them, you may use a sharp razor knife to cut the MagnaMedia panel to the opening or wall using the wall as a guide (see Illustration 8).
The best way to store MagnaMedia graphics long term is to roll them on a core image side out and wrap the roll with a plastic or paper to protect them from dust/dirt. Rolling the graphics image side out ensures that any amount of roll-set in the panel will help keep the corners tight against the wall when rolled out. Storing the graphics iron coating (black side) out may result in a roll set that curls the graphic panels away from the wall.
The Visual Magnetics Graphic System was designed for graphic applications and layering of multiple graphic panels. The InvisiLock magnet does, however, have properties that make it suitable for magnetically attaching small shelves and panels to your graphic wall (see Illustration 9).
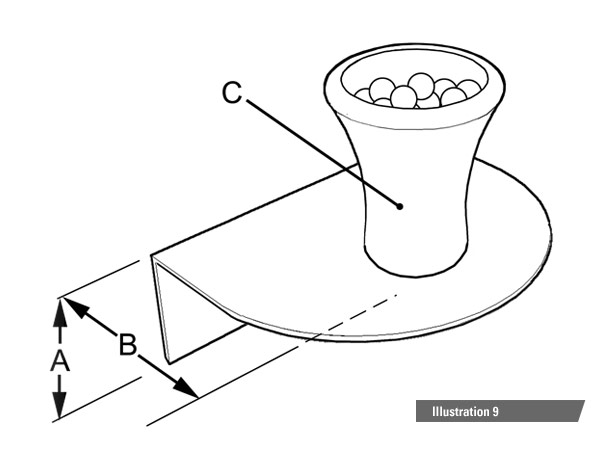
Three key elements for successful fixturing include:
- Magnetic surface area
- Center of mass’ distance from the wall
- Weight of the fixture and objects being being placed on it
The best scenario is a maximum magnet-to-magnet surface area to keep a minimum amount of weight as close to the wall as possible. We recommend you always make a prototype and we do not recommend using magnetic fixtures where the general public can move them or pull them down.
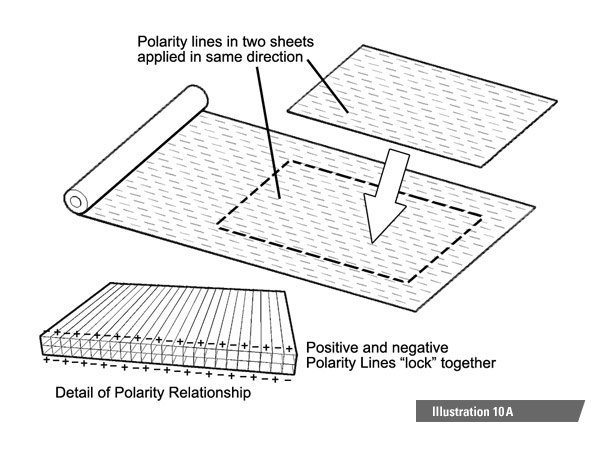
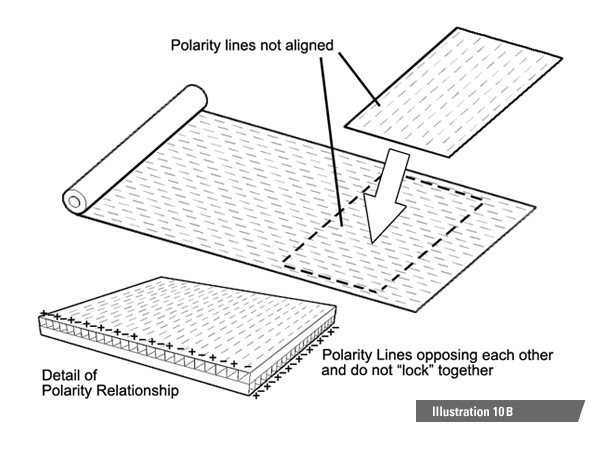
A note about polarity in magnetic sheeting: Magnetic sheeting has polarized lines that provide the magnetic field/attraction at the surface of the sheeting. When (2) sheets of InvisiLock are applied to each other in the same orientation then the lines of polarity will “lock” into place. When the (2) sheets are not aligned or are applied perpendicular to each other, the polarity lines repel each other in places and the overall magnetic attraction is greatly reduced (see Illustration 10A).
When the (2) sheets are not aligned or are applied perpendicular to each other, the polarity lines repel each other in places and the overall magnetic attraction is greatly reduced (see Illustration 10B).
If fixturing is desired on a graphic wall, we recommend that all of the sheets/tiles of Invisilock be installed in the same orientation (horizontal or vertical) so that the lines of polarity are all going in the same direction.
Installation note: When applying InvisiLock to a panel or the back of a shelf that will then be mounted to an existing VM graphic wall, always be sure that you know which way the magnetic sheeting is applied on the wall and match this orientation on the fixture.
Please note that Invisilock orientation is not a factor when using just the magnetic-receptive MagnaMedia. Magnet sheet orientation is only a concern in magnet-to-magnet applications.
Applying the Invisilock to your walls: When applying InvisiLock on walls that will have fixtures attached, we recommend minimizing seams in the Invisilock and aligning polarity lines wherever fixtures will span these seams. Rolls of Invisilock (as opposed to tiles) minimize seams and alignment of polarity lines can be done using an 18” – 24” square piece of Invisilock (see Illustration 11).
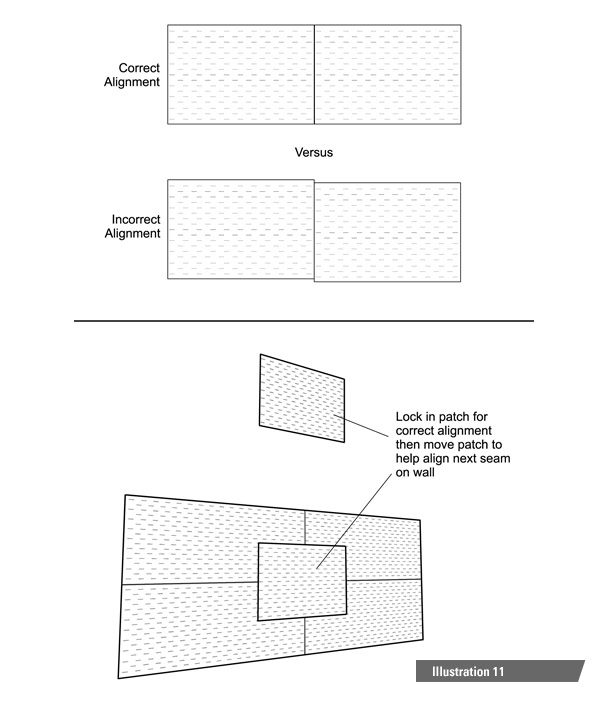
Again, this detail is important for maximizing fixture strength across seams in the InvisiLock back wall and is of no consequence where fixtures are not applied to the wall (perhaps really high or really low places on the wall).
Applying the Invisilock to your fixture(s): Because the lines of polarity are evenly distributed on both the wall and on your fixture, you will need to be sure that the orientation of the lines on your fixture match that of the wall. If placement of the fixture needs to be precise to 1/16 – 1/8” then locking the magnet to the wall (in the desired location) and then sticking the fixture to it, will ensure that the fixture will always lock into the same location time after time. This may be important when multiple fixtures need to line up with each other but is of no consequence if the fixture placement has tolerances of +/- 1/8”.
Locking your fixture into place: Once the fixture has Invisilock applied to the back, the best way to ensure a proper mounting to the wall is to place the fixture against the wall and turn it until you feel the polarity lines “lock” into place. Then put a little weight on the fixture to ensure that it is stable and will not pop off the wall.
Note: regular Invisilock HE is dark brown in color and may leave black marks on your graphic wall when positioning onto the wall. We recommend using our Invisilock with Surface Protect (Invisilock 30HP) on fixtures that are going direct onto mural graphics to prevent these scuff marks.
Problem: MagnaMedia surface is bubbling or wrinkling.
Bubbles or tunneling in the outer layer of material is oftentimes caused by an uneven rollout of the outer layer. To correct this, simply roll up the graphic panel evenly in a 3” – 4” roll, line up the leading edge and roll out the material evenly. Some tunnels can be removed by simply by lifting up the bottom of the panel to where the tunnel is and then releasing it so that it naturally falls onto the magnet evenly.